Single server: upgrade
A single server installation is being considered a non-production installation. For a production installation some kind of orchestration should be applied. A single server installation of FOLIO is useful for demo and testing purposes.
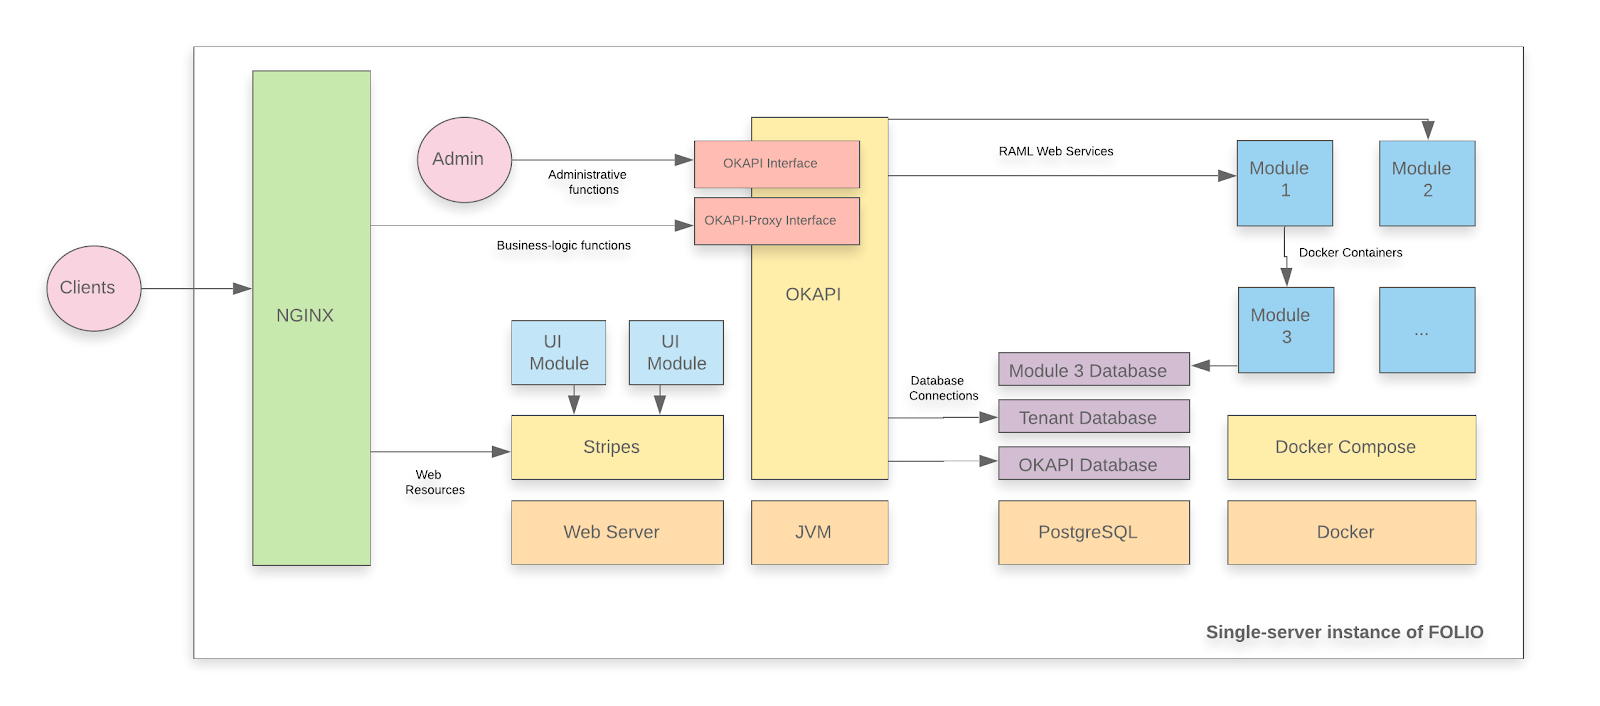
A FOLIO instance is divided into two main components. The first component is Okapi, the gateway. The second component is the UI layer which is called Stripes. The single server with containers installation method will install both.
Upgrade-based installation
This is a documentation for an upgrade of your FOLIO system.
-
It assumes that you have already successfully installed a FOLIO system and now want to upgrade your system to Morning Glory.
-
If you are deploying FOLIO for the first time, or if you want to start with a fresh installation for whatever reasons, see how to do a fresh installation of a single server deployment.
-
This documentation shows how to upgrade to a platform-complete distribution of Morning Glory.
-
Throughout this documentation, the sample tenant “diku” will be used. Replace with the name of your tenant, as appropriate.
System requirements
Software requirements
| Requirement | Recommended Version |
|---|---|
| Operating system | Ubuntu 20.04.02 LTS (Focal Fossa) 64-bits |
| FOLIO system | Lotus (R1-2022) |
Hardware requirements
| Requirement | FOLIO Extended Apps |
|---|---|
| RAM | 40GB |
| CPU | 8 |
| HD | 350 GB SSD |
I. Before the Upgrade
First do a snapshot of your system, so you will be able to replay the current status in case the upgrade fails.
First do Ubuntu Updates & Upgrades
sudo apt-get update
sudo apt-get upgrade
sudo reboot
Check if all Services have been restarted after reboot: Okapi, postgres, docker, the docker containers (do: docker ps –all | more ) , Stripes and nginx.
Read carefully the Morning Glory Release Notes. Do these actions:
i. PostgreSQL version
Minimum required PostgreSQL version is 12. Check your postgresql version:
psql --version
psql (PostgreSQL) 12.11 (Ubuntu 12.11-0ubuntu0.20.04.1)
If your version is 11 or lower, upgrade postgresql to version 12.
ii. mod-search indices will need to recreate for both instance and authority
Sometimes we need to recreate OpenSearch or Elasticsearch index, for example when a breaking change introduced to index structure (mapping). It can be fixed by running reindex request: Assure the following permission has been assigned to user diku_admin:
search.index.inventory.reindex.post (Search - starts inventory reindex operation)
Get a new Token, then recreate the index:
   export TOKEN=$( curl -s -S -D - -H "X-Okapi-Tenant: diku" -H "Content-type: application/json" -H "Accept: application/json" -d '{ "tenant" : "diku", "username" : "diku_admin", "password" : "admin" }' http://localhost:9130/authn/login | grep -i "^x-okapi-token: " )
  curl -w '\n' -D - -X POST -H "$TOKEN" -H "X-Okapi-Tenant: diku" -H "Content-type: application/json" -d '{ "recreateIndex": true, "resourceName": "instance" }' http://localhost:9130/search/index/inventory/reindex
Result will be something like this:
{"id":"88beb64c-d778-4367-bf9d-5b7b3adc3b56","jobStatus":"In progress","submittedDate":"2022-11-11T10:38:35.791+00:00"}
Monitor the re-indexing process. In order to check how many records published to Kafka topic use inventory API:
curl -w '\n' -D - -X GET -H "$TOKEN" -H "X-Okapi-Tenant: diku" -H "Content-type: application/json" http://localhost:9130/instance-storage/reindex/88beb64c-d778-4367-bf9d-5b7b3adc3b56
Use the id that you have obtained above when you started reindex.
More preparatory steps
There might be more preparatory steps that you need to take for your installation. If you are unsure what other steps you might need to take, study carefully the Morning Glory Release Notes. Do all actions in the column “Action required”, as appropriate for your installation.
II. Reinstall the Backend, Migrate from Lotus to Morning Glory
II.i) Fetch a new version of platform-complete
Fetch the new release version of platform-complete, change into that directory:
cd platform-complete
git fetch
There is a branch R2-2022-GA. We will deploy this version. Check out this Branch. Stash local changes. This should only pertain to stripes.config.js . Discard any changes which you might have made on the install-jsons:
git restore install.json
git restore okapi-install.json
git restore stripes-install.json
git restore package.json

git stash save
git checkout master
git pull
git checkout R2-2022-GA
git stash pop
Don’t install plain GA but exchange GA versiones by fixed versions !: mod-data-export-4.5.1 => mod-data-export-4.5.2 (https://issues.folio.org/browse/MDEXP-566) mod-authtoken-2.11.0 => mod-authtoken-2.11.1 (https://issues.folio.org/browse/MODAT-136) Edit install.json and okapi-install.json accordingly (replace version numbers).
II.ii) Upgrade Okapi
Upgrade the Okapi version and restart Okapi. Read the Morning Glory Okapi version from install.json: okapi-4.14.4
Update the Okapi Debian package:
sudo add-apt-repository "deb https://repository.folio.org/packages/ubuntu focal/"
sudo apt-get update
sudo apt-get -y --allow-change-held-packages install okapi=4.14.4-1
Check Okapi logging properties in /etc/folio/okapi. Check that this line is in okapi.conf:
log4j_config="/etc/folio/okapi/log4j2.properties"
Edit log4j2.properties. Make sure Okapi logs into a file and define a RollingFileAppender :
appenders = f

appender.f.type = RollingFile
appender.f.name = File
appender.f.fileName = /var/log/folio/okapi/okapi.log
appender.f.filePattern = /var/log/folio/okapi/okapi-%i.log
appender.f.layout.type = PatternLayout
appender.f.layout.pattern = %d{HH:mm:ss} [$${FolioLoggingContext:requestid}] [$${FolioLoggingContext:tenantid}] [$${FolioLoggingContext:userid}] [$${FolioLoggingContext:moduleid}] %-5p %-20.20C{1} %m%n
appender.f.policies.type = Policies
appender.f.policies.size.type = SizeBasedTriggeringPolicy
appender.f.policies.size.size = 200MB
appender.f.strategy.type = DefaultRollOverStrategy
appender.f.strategy.max = 10

rootLogger.level = info
rootLogger.appenderRefs = f
rootLogger.appenderRef.f.ref = File
Restart Okapi:
sudo systemctl daemon-reload
sudo systemctl restart okapi.service
Follow /var/log/folio/okapi/okapi.log .
Now Okapi will re-start your modules. Follow the okapi.log. It will run for 5 minutes or so until all modules are up again. Check if all modules are running:
docker ps --all | grep "mod-" | wc
  64
Retrieve the list of modules which are now being enabled for your tenant (just for your information):
curl -w '\n' -XGET http://localhost:9130/_/proxy/tenants/diku/modules
...
}, {
  "id" : "okapi-4.14.4"
} ]
You should see 10 Edge modules, 48 Frontend modules (folio_*), 64 Backend modules (mod-*), if you are starting from Lotus, platform-complete + the Morning Glory version of Okapi (4.14.4).
II.iii) Pull module descriptors from the central registry
A module descriptor declares the basic module metadata (id, name, etc.), specifies the module’s dependencies on other modules (interface identifiers to be precise), and reports all “provided” interfaces. As part of the continuous integration process, each module descriptor is published to the FOLIO Registry at https://folio-registry.dev.folio.org.
curl -w '\n' -D - -X POST -H "Content-type: application/json" \
  -d { "urls": [ "https://folio-registry.dev.folio.org" ]  http://localhost:9130/_/proxy/pull/modules
Okapi log should show something like
 INFO  ProxyContext         283828/proxy REQ 127.0.0.1:51424 supertenant POST /_/proxy/pull/modules  okapi-4.14.4
 INFO  PullManager          Remote registry at https://folio-registry.dev.folio.org is version 4.14.4
 INFO  PullManager          pull smart
  ...
 INFO  PullManager          pull: 3466 MDs to insert
 INFO  ProxyContext         283828/proxy RES 200 93096323us okapi-4.14.4 /_/proxy/pull/modules
II.iv) Deploy a compatible FOLIO backend
Check your Okapi environment:
curl -X GET http://localhost:9130/_/env
At this point, (re-)configure the environment variables of your modules, as needed. Study the release notes for any changes in module configurations. Follow these instructions to change the environment variables for a module: Change Environment Variables of a Module.
Deploy all backend modules of the new release with a single post to okapi’s install endpoint. This will deploy and enable all new modules and undeploy the modules of the old version which are not needed anymore. Start with a simulation run:
  curl -w '\n' -D - -X POST -H "Content-type: application/json" -d @/usr/folio/platform-complete/okapi-install.json http://localhost:9130/_/proxy/tenants/diku/install?simulate=true\&preRelease=false
  curl -w '\n' -D - -X POST -H "Content-type: application/json" -d @/usr/folio/platform-complete/okapi-install.json http://localhost:9130/_/proxy/tenants/diku/install?deploy=true\&preRelease=false\&tenantParameters=loadReference%3Dfalse
You can follow the progress on the terminal screen and/or in /var/lib/folio/okapi/okapi.log .
If that fails, remedy the error cause and try again until the post succeeds. In case of previous failures, old modules might not have been undeployed and will still be running. We will account for this later in the “clean up” section.
II.v) Enable the frontend modules for your tenant
Use the parameter deploy=false for the frontend modules and post the complete list of modules install.json to the okapi install endpoint. This will enable all modules of the release version for your tenant. Don’t load reference data if you are doing a system upgrade.
curl -w '\n' -D - -X POST -H "Content-type: application/json" -d @/usr/folio/platform-complete/install.json http://localhost:9130/_/proxy/tenants/diku/install?simulate=true\&preRelease=false
curl -w '\n' -D - -X POST -H "Content-type: application/json" -d @/usr/folio/platform-complete/install.json http://localhost:9130/_/proxy/tenants/diku/install?deploy=false\&preRelease=false\&tenantParameters=loadReference%3Dfalse
II.vi) Cleanup
Clean up. Undeploy all unused containers. Go through the list install.json, check if all modules mentioned there have actually been deployed for your tenant (compare the two lists):
curl -w '\n' -XGET http://localhost:9130/_/proxy/tenants/diku/modules
Also, look up in the list of deployed containers for backend modules if containers for old module versions are still deployed or if they have been deployed twice for the same module version:
docker ps --all | grep mod-
Required Actions:
- undeploy old module versions, e.g. like this:
curl -w '\n' -D - -X DELETE http://localhost:9130/_/discovery/modules/mod-agreements-5.1.1
curl -w '\n' -D - -X DELETE http://localhost:9130/_/discovery/modules/mod-audit-2.4.2
Result
for Morning Glory GA 65 backend modules, “mod-*” are contained in the list install.json. Those 65 backend modules are now being enabled for your tenant. 65 containers for those backend modules are running in docker on your system.
Now, finally once again get a list of the deployed backend modules:
curl -w '\n' -D - http://localhost:9130/_/discovery/modules | grep srvcId | wc
65
Compare this with the number of your running docker containers:
docker ps --all | grep "mod-" | wc
  65
docker ps --all | wc
  72
The following containers are running on your system, but do not contain backend modules:
Stripes
3x Elasticsearch
Kafka
Zookeper
In sum, these are 6 containers without backend modules. Also subtract the header line (of “docker ps”), and you will arrive at 72 - 7 = 65 containers with backend modules (the figure of the first “wc”).
Modules enabled for your tenant:
curl -w '\n' -XGET http://localhost:9130/_/proxy/tenants/diku/modules | grep id | wc
  132
This number is the sum of the following:
- 57 Frontend modules
- 9 Edge modules
- 65 Backend modules (R2-2022)
- 1 Okapi module (4.14.4)
These are all R2 (Morning Glory) modules.
The backend of the new tenant is ready. Now, you have to set up a new Stripes instance for the frontend of the tenant.
III. Frontend installation : Stripes
Install Stripes and nginx in a Docker container. Use the docker file of platform-complete. Check if everything looks o.k. in platform-complete/docker. If you have successfully installed last time, you should not need to change anything. Just do a “git diff”.
cd ~/platform-core
edit docker/Dockerfile
    ARG OKAPI_URL=http(s)://<YOUR_DOMAIN_NAME>/okapi
    ARG TENANT_ID=diku # Or change to your tenant's name
  edit docker/nginx.conf
server {
  listen 80;
  server_name <YOUR_SERVER_NAME>;
  charset utf-8;
  access_log  /var/log/nginx/host.access.log  combined;

  # front-end requests:
  # Serve index.html for any request not found
  location / {
    # Set path
    root        /usr/share/nginx/html;
    index       index.html index.htm;
    include mime.types;
    types {
      text/plain lock;
    }
    try_files $uri /index.html;
  }

  # back-end requests:
  location /okapi {
    rewrite ^/okapi/(.*) /$1 break;
    proxy_pass http://<YOUR_IP_ADDRESS>:9130/;
  }
}
<YOUR_SERVER_NAME> should be the real name of your server in your network. <YOUR_SERVER_NAME> should consist of host name plus domain name, e.g. myserv.mydomain.edu.
  edit stripes.config.js
      okapi: { 'url':'http(s)://<YOUR_DOMAIN_NAME>/okapi', 'tenant':'diku' },
Finally, build the docker container which will contain Stripes and nginx :
  sudo su
  docker build -f docker/Dockerfile --build-arg OKAPI_URL=http(s)://<YOUR_DOMAIN_NAME>/okapi --build-arg TENANT_ID=diku -t stripes .
Sending build context to Docker daemon  1.138GB
Step 1/19 : FROM node:15-alpine as stripes_build
...
Step 19/19 : ENTRYPOINT ["/usr/bin/entrypoint.sh"]
 ---> Running in a47dce4e3b3e
Removing intermediate container a47dce4e3b3e
 ---> 48a532266f21
Successfully built 48a532266f21
Successfully tagged stripes:latest
This will run for approximately 10 minutes.
Stop the old Stripes container: docker stop
Completely free your port 80. Look if something is still running there: e.g., do
netstat -taupn | grep 80
If there should be something still running on port 80, kill these processes.
Start the stripes container:
Redirect port 80 from the outside to port 80 of the docker container:
nohup docker run -d -p 80:80 stripes
Log in to your frontend: E.g., go to http://<YOUR_HOST_NAME>/ in your browser.
-
Can you see the R2 modules in Settings - Installation details ?
-
Do you see the right okapi version, 4.12.4-1 ?
-
Does everything look good ?
If so, remove the old stripes container: docker rm <container id of your old stripes container> .
The system is ready!
Last modified June 30, 2023